
Setting Up a Connection
This page will show you how to set up a connection to the Quantemplate API
User and Secret
In order to connect to the API, you'll first need to make sure that you have a dedicated 'API user' set up. Contact Quantemplate Support to do that for you.
Once your API user has been created, you will be provided with the Client ID and the Client Secret by Quantemplate Support.
Storing and using secretsYour Secret acts like a password. It will only be given to you once. Take precautions to store and use your secret securely. Approaches to managing secrets are discussed in this article!
Authenticating
When you have your ID and Secret, you are ready to authenticate with the API.
Authentication consists of making a POST request to
https://accounts.prod.quantemplate.com/auth/realms/qt/protocol/openid-connect/token
with the request body:
{
  "grant_type": "client_credentials",
  "client_id": <your client id>,
  "client_secret": <your client secret>
}
This will return a JSON object with an access_token and refresh_token properties, among others. The access_token is what you will need to use when calling other API methods, and has a set expiry time (given, in seconds, by the expires_in property).
Example: Python 3
This short script demonstrates how to retrieve your access token in Python 3. It requires the requests library.
#!/usr/bin/env python3
import requests
user_id = ...
secret = ...
def authenticate(user_id, secret):
return requests.post('https://accounts.prod.quantemplate.com/auth/realms/qt/protocol/openid-connect/token', data = {
'grant_type': 'client_credentials',
'client_id': user_id,
'client_secret': secret
}).json()
auth_result = authenticate(user_id, secret)
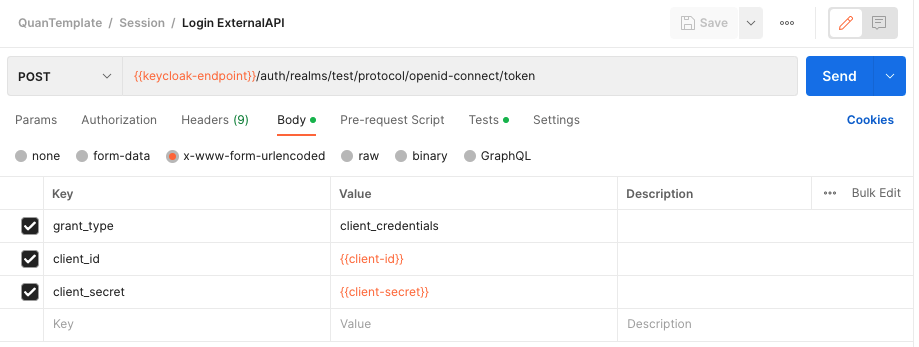
print(auth_result['access_token'])Example: Postman
Using postman, make a POST request as detailed above
Select the x-www-form-urlencoded option instead of raw payload.
This will set a proper Content-Type header.
Updated about 1 year ago