Capital IQ integration 2 – data across categories
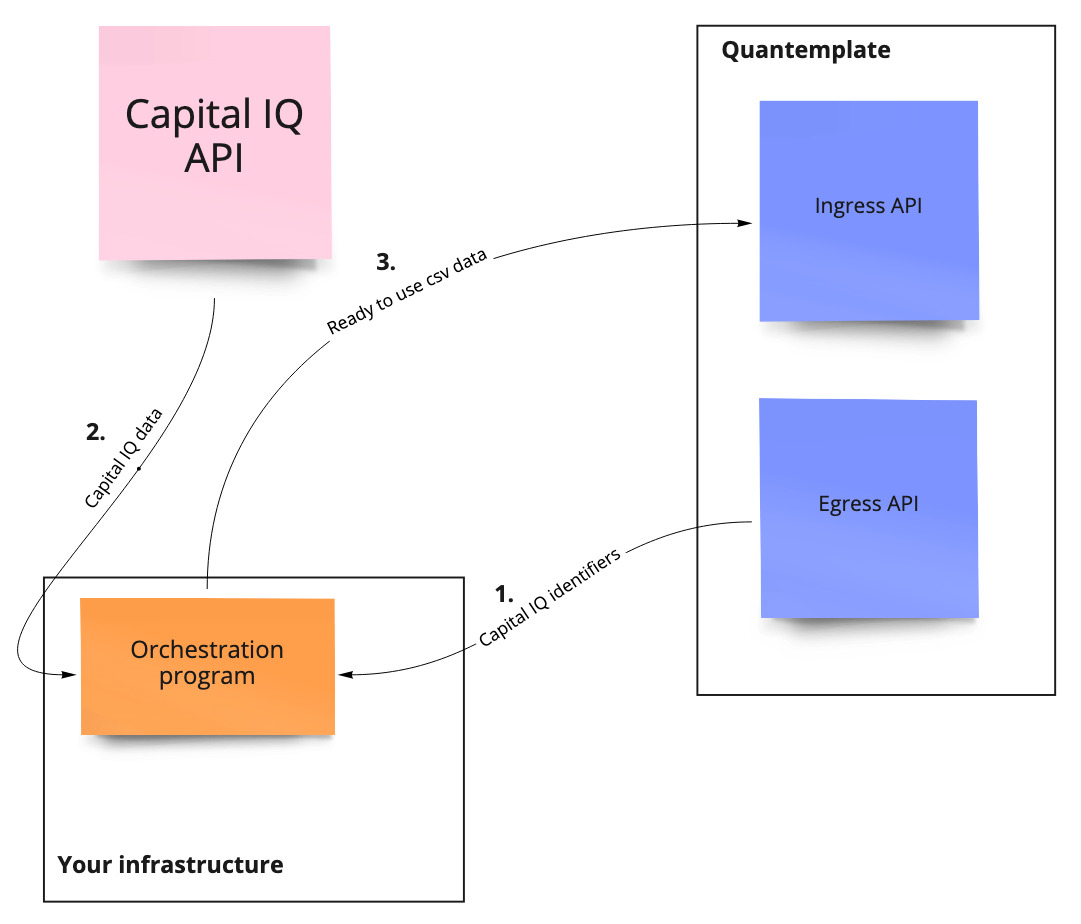
This page demonstrates the usage of an orchestration program allowing querying of the S&P Capital IQ database and uploading of the results to Quantemplate based on Identifiers stored in a Quantemplate dataset
In this example, we will take a look at how to enrich your pipeline output with additional Capital IQ data, taking data across categories for a single year. For this, we will use an orchestration program that will download Capital IQ identifiers from a dataset produced by the existing pipeline, enhance it with additional parameters from Capital IQ such as Net Income or Market Cap and upload to a new Quantemplate dataset.
Capital IQ IDsYou can also take a look at a simpler example which uses locally defined Capital IQ identifiers.
PrerequisitesBefore trying this example, make sure you have:
- a Quantemplate dataset with Capital IQ identifiers in one of its columns
- an existing Quantemplate API User and Secret
- a valid Capital IQ API license
- and Java 8 environment installed on your system

A diagram showing the architecture of the Capital IQ integration
Step 1: Configure source dataset permissions
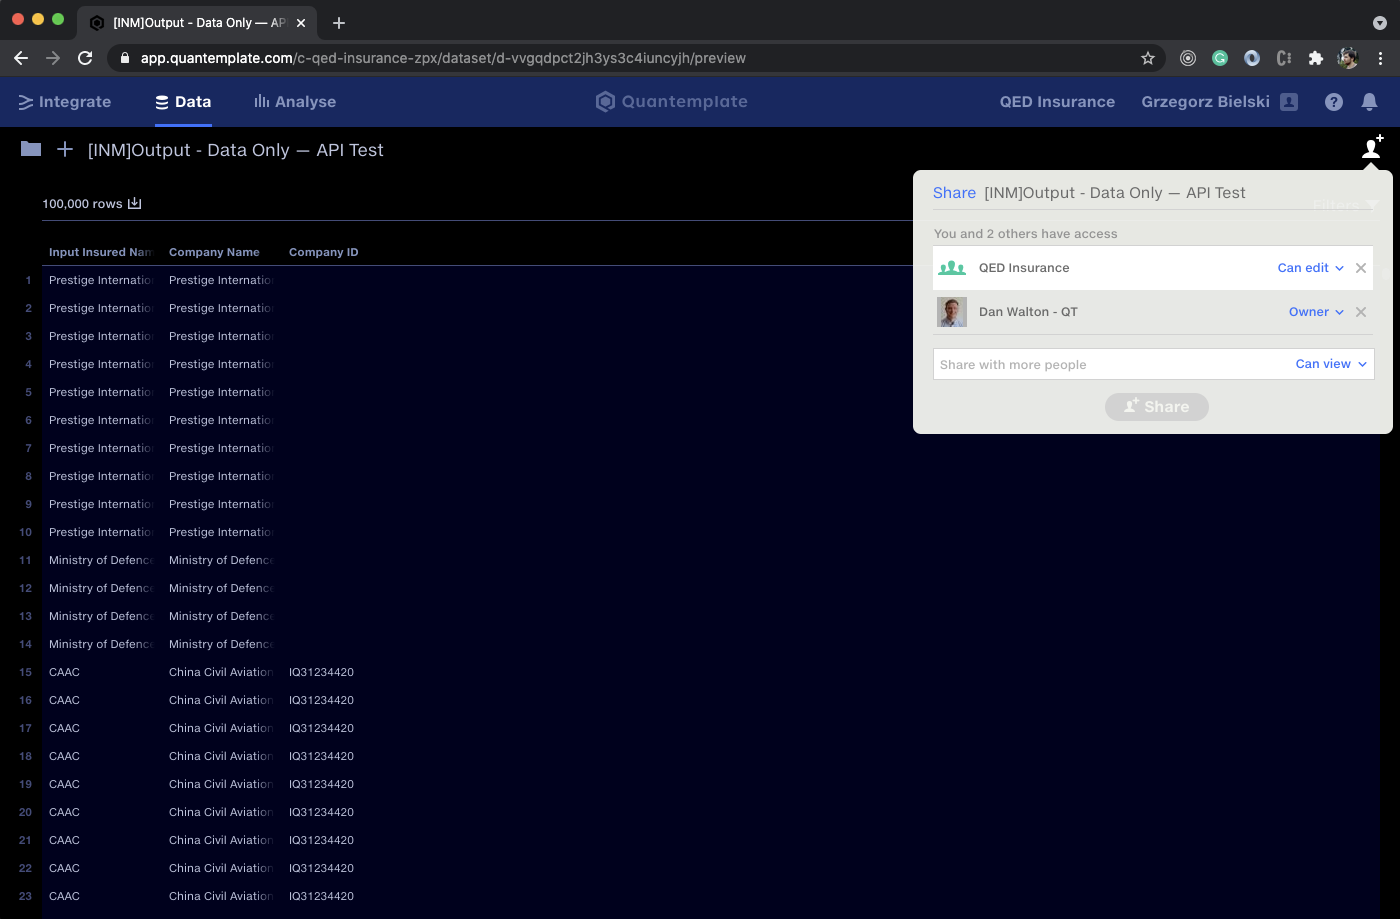
This tutorial assumes that in your Quantemplate organisation you already have a dataset that hosts a column with Capital IQ identifiers. Such a dataset could have been created as a company name matching pipeline.
To access this dataset navigate to the Quantemplate app, choose the Data tab, and find your existing source dataset in the finder.
Share the document with the API User via the sharing popup. Assign 'Can Edit' permissions.

Check the URL to get the relevant IDs, and share the dataset with the whole organisation
Extracting the IDs from the URL
To load Capital IQ identifiers from the dataset we will need its ID, as well as organisation ID.
Take a look at the URL used by your dataset. In the screenshot above this is https://app.quantemplate.com/c-qed-insurance-zpx/dataset/d-vvgqdpct2jh3ys3c4iuncyjh/preview.
From this, you can extract the IDs as follows:
app.quantemplate.com/organisation id/dataset/dataset id/preview
In this particular example:
- organisation ID is
c-qed-insurance-zpx/ - dateset ID is is
d-vvgqdpct2jh3ys3c4iuncyjh
Notice, that Capital IQ identifiers are located in the Company ID column, we will need that info in the next steps.
Step 2: Configure target dataset and its permissions
Our integration also requires a target dataset that will contain data enriched by the Capital IQ API.
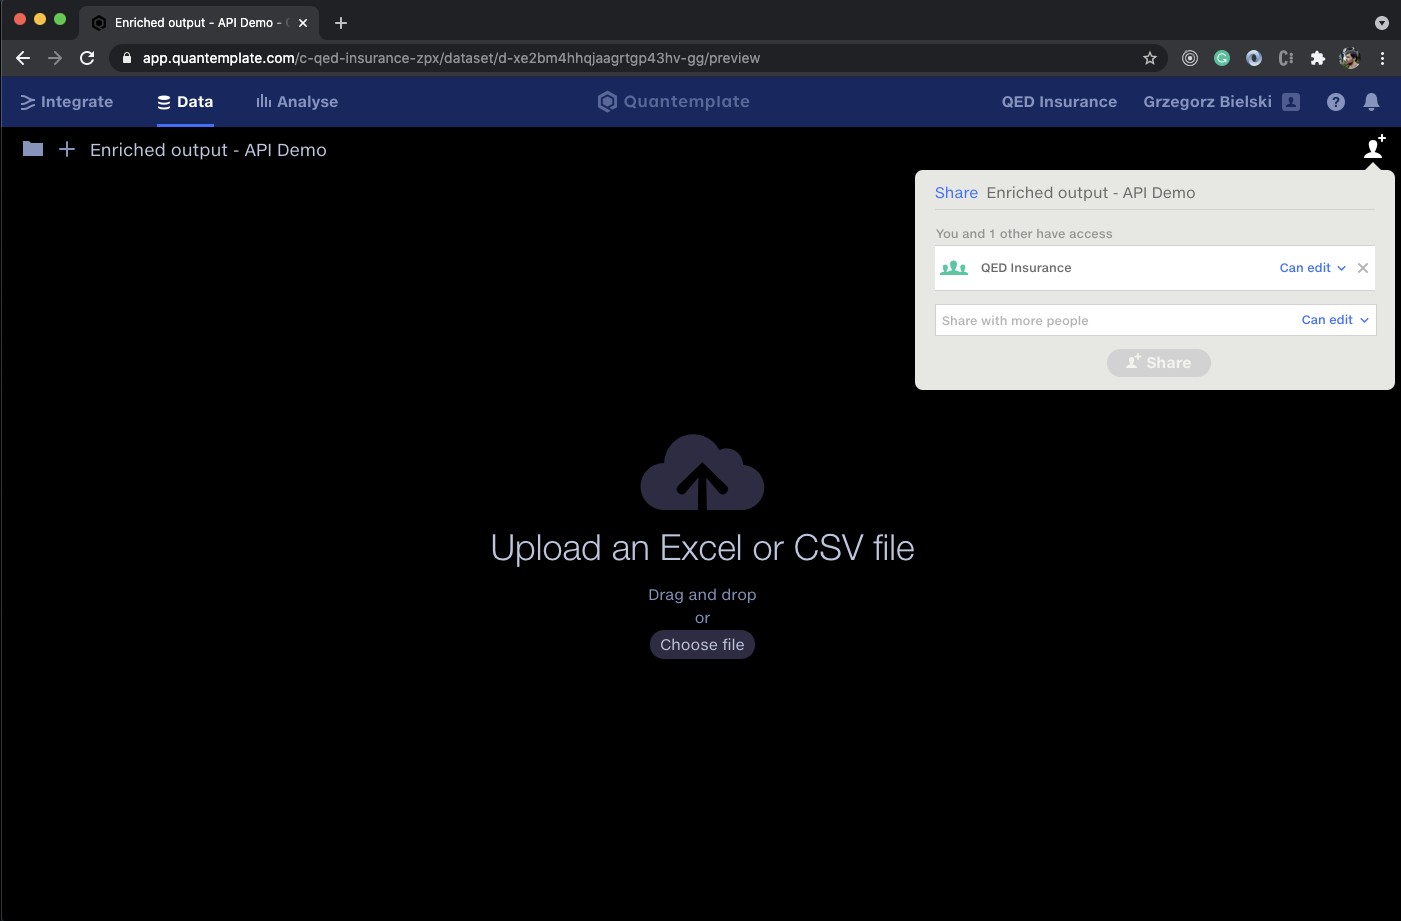
For that, navigate to the Data tab in Quantemplate again and create a new dataset. Make sure it's shared with the whole org, otherwise your Quantemplate API User won't be able to access it.

Check the URL to get the relevant IDs, and share the dataset with the whole organisation
Extracting the dataset ID from the URL
To point to our target dataset we need its ID. To extract it from the URL follow the exact same procedure as seen in Step 1.
This target dataset has an ID of d-xe2bm4hhqjaagrtgp43hv-gg
Step 3: Setting up orchestration program
Similarly to the first Capital IQ integration example, we will use our existing open-source Quantemplate API integration helper.
In order to download the helper, navigate to the releases section and click on qt-integrations-0.1.2.jar. This will download Java 8+ compatible jar.
Environment variables
The integration helper expects a few environment variables used for configuring API access, in particular:
CAPITALIQ_API_USERNAME=<api username you got with Capital IQ API license>
 CAPITALIQ_API_PASSWORD=<password for the corresponding Capital IQ API user>
 CAPITALIQ_DEMO_ACCOUNT=<indicates whether the Capital IQ demo account is used>
 QT_ENV=<name of the Quantemplate environment, should be `prod` for any consumers>
 QT_AUTH_REALM=<name of the Quantemplate auth ream, should be `qt` for any consumers>
 QT_CLIENT_ID=<id of the api-client user generated by the Quantemplate team>
 QT_CLIENT_SECRET=<password for the used api-client user, also provided by the Quantemplate team>
You can save this file as a .env and fill out the < > spots with your settings.
Then these options could be exported as environment variables. In macOS and Linux this could be done using a simple export $(xargs < .env) command.
Step 4: Configure the Capital IQ integration properties
Having environment variables from the previous step in your command line session you can start using the program.
For this example, we will use the generateMultiDataPointReport command. It can be configured through an easy-to-read YAML file:
command: generateMultiDataPointReport
params:
  orgId: c-qed-insurance-zpx                 # Quantemplate organisationId
  datasetId: d-xe2bm4hhqjaagrtgp43hv-gg      # Quantemplate target datasetId from Step 2
  currency: USD                              # Currency supported by the Capital IQ
  date: 2021-05-05                           # Date for the Capital IQ queries
  identifiers:
    distinct: true                           # Use only unique identifiers
    limit: 50                                # Use only first 50 identifiers
    dataset:
      datasetId: d-vvgqdpct2jh3ys3c4iuncyjh  # Source dataset of the Capital IQ identifiers from Step 1
      columnName: Company ID                 # Name of the column in the source dataset that hold the identifiers
  columns:                                   # Capital IQ mnemonics used for the columns construction
    - IQ_COMPANY_NAME_LONG
    - IQ_COMPANY_ID
    - IQ_ULT_PARENT
    - IQ_ULT_PARENT_CIQID
    - IQ_TOTAL_REV
    - IQ_MARKETCAP
    - IQ_NI
    - IQ_TOTAL_EMPLOYEES
The above configuration instructs the orchestration program to construct a report with 8 columns defined in the columns section as of the 5th of May 2021 in USD. Each of the columns is defined as a Capital IQ mnemonic. You can learn more about Capital IQ mnemonics at the Capital IQ API support center. The identifiers necessary for the request will be extracted from the Company ID column of the d-vvgqdpct2jh3ys3c4iuncyjh. In this scenario, we will load only the first 50 unique identifiers.
Step 5: Upload the report from Capital IQ to the Quantemplate
With a YAML file and appropriate env variables in your session you can run the integration helper with just a:
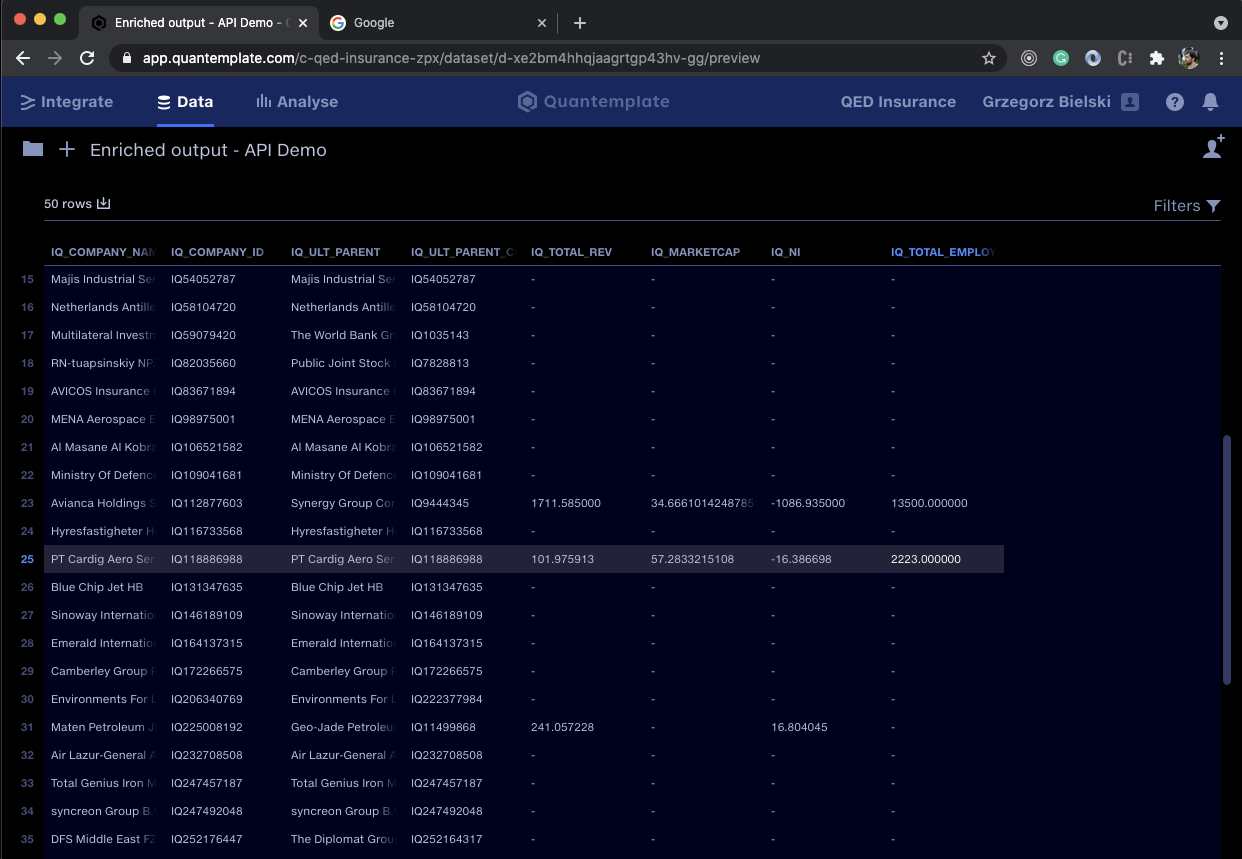
java -jar qt-integrations-0.1.2.jar apply ./data/multiPointReport.ymlAfter a few seconds, the program should have finished its work and you will be able to go back to the Quantemplate app and refresh the page with your target dataset:

Capital IQ data uploaded using the Quantemplate API integration
The whole program is open-sourced so you can either extend it yourself or roll out your own solution based on its internals.
Updated 9 months ago
