Google Geocoding integration
This page demonstrates the end-to-end pipeline automation which integrates results from connecting the Google Maps Geocoding API through an orchestration program
Integration overview
The following example will showcase an integration scenario in which we use the public Quantemplate API offering to automate a chain of pipeline executions enhanced by data from Google Maps Geocoding API service.

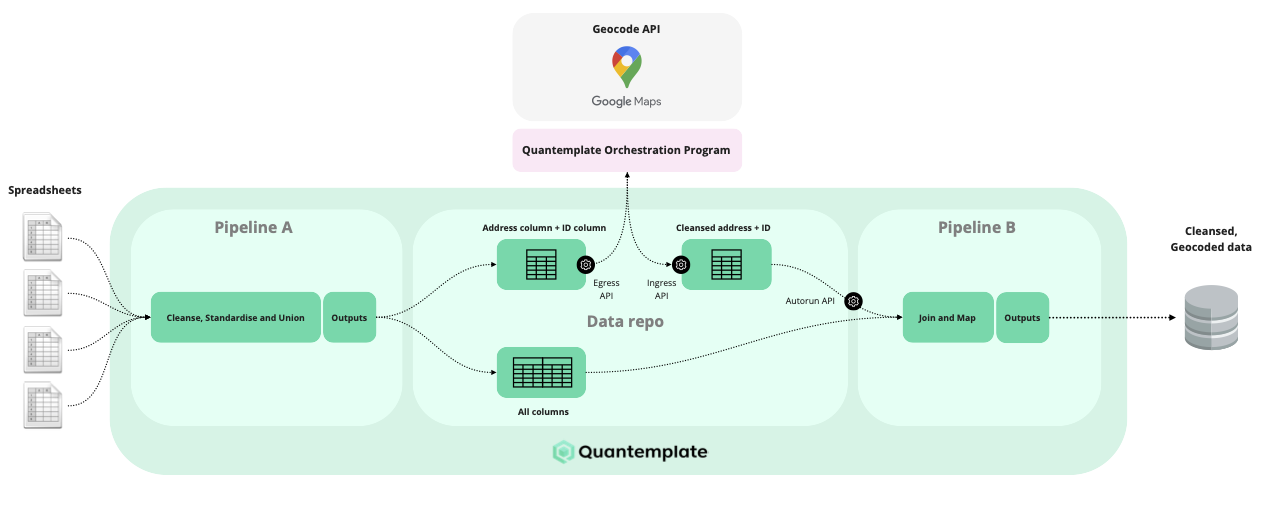
Quantemplate pipelines and orchestration program interfacing with Google Geocoder
Similar to the Capital IQ integration example, we will use an open-sourced program that uses the Quantemplate APIs.
As you can see in the diagram above - the program will first execute pipeline A and download its output. The output needs to have a column with addresses for geocoding and ID column, which will be used in the join stage of the Pipeline B. In our example the address column is LOCNAME and the ID column is LOCNUM.
Input data
| Address (LOCNAME) |
|---|
| Wadleigh Memorial Library49 Nashua Street - Milford |
| Clarksville Public Library401 Second Street - Clarksville |
| East Providence Public Library41 Grove Avenue - East Providence |
In order to wait for the pipeline to finish its execution, we will just query the execution list endpoints every few seconds to see if our execution has already been completed. This is the same approach as in the end-to-end pipeline execution example.
For longer running pipelines we are recommending the use of pipeline notifications API
The data in the downloaded output from the address column will be sent to the Google Geocoding service, which will bring additional information such as latitude, longitude, place ID, and address components, separated by category. This will be merged back to data obtained from the pipeline output and uploaded to another Quantemplate dataset, which will work as a Pipeline B's input.
Once Pipeline B's input dataset has been uploaded, the orchestration program will execute pipeline B and wait for it to finish.
Output data
| LOCNAME | latitude | longitude | postal code | formatted address | route | street number | addministrative area 1 | addministrative area 2 | country |
|---|---|---|---|---|---|---|---|---|---|
| Wadleigh Memorial Library49 Nashua Street - Milford | -42.8352485 | -71.64796510000001 | 03055 | 49 Nashua St, Milford, NH 03055, USA | Nashua Street | 49 | Hillsborough County | New Hampshire | USA |
| Clarksville Public Library401 Second Street - Clarksville | 36.5210205 | 87.34073719999999 | 37040 | 350 Pageant Ln #501, Clarksville, TN 37040, USA | Pageant Lane | 350 | Montgomery County | Tennessee | USA |
| East Providence Public Library41 Grove Avenue - East Providence | 41.818466 | 71.375259 | 02914 | 41 Grove Ave, East Providence, RI 02914, USA | Grove Avenue | 41 | Providence County | Rhode Island | USA |
Step 1: Prerequisites
Before we start diving in, there are a couple of necessary steps which need to be completed first, and are covered in other tutorials.
Quantemplate app prerequisitesThis example assumes that you have a Quantemplate organisation with:
- a Quantemplate pipeline output with ID column and address column
- a Quantemplate dataset set up as input for another Quantenplate pipeline
Make sure that all of the pipelines and their inputs are shared with the whole org.
Integration program prerequisitesBefore trying this example, make sure you have:
- an existing Quantemplate API User and Secret
- a valid Google Maps Geocoding API key
- a Java 8 environment installed on your system
Step 2: Extracting necessary IDs from the URLs
Our integration needs the ID of the organisation, ID of the pipeline A and its output, and an ID of pipeline B and its input dataset. All of this can be obtained from the URLs in the web application.
First, log in to Quantemplate, navigate to your pipeline and choose the output with a column that will be used for geocoding.

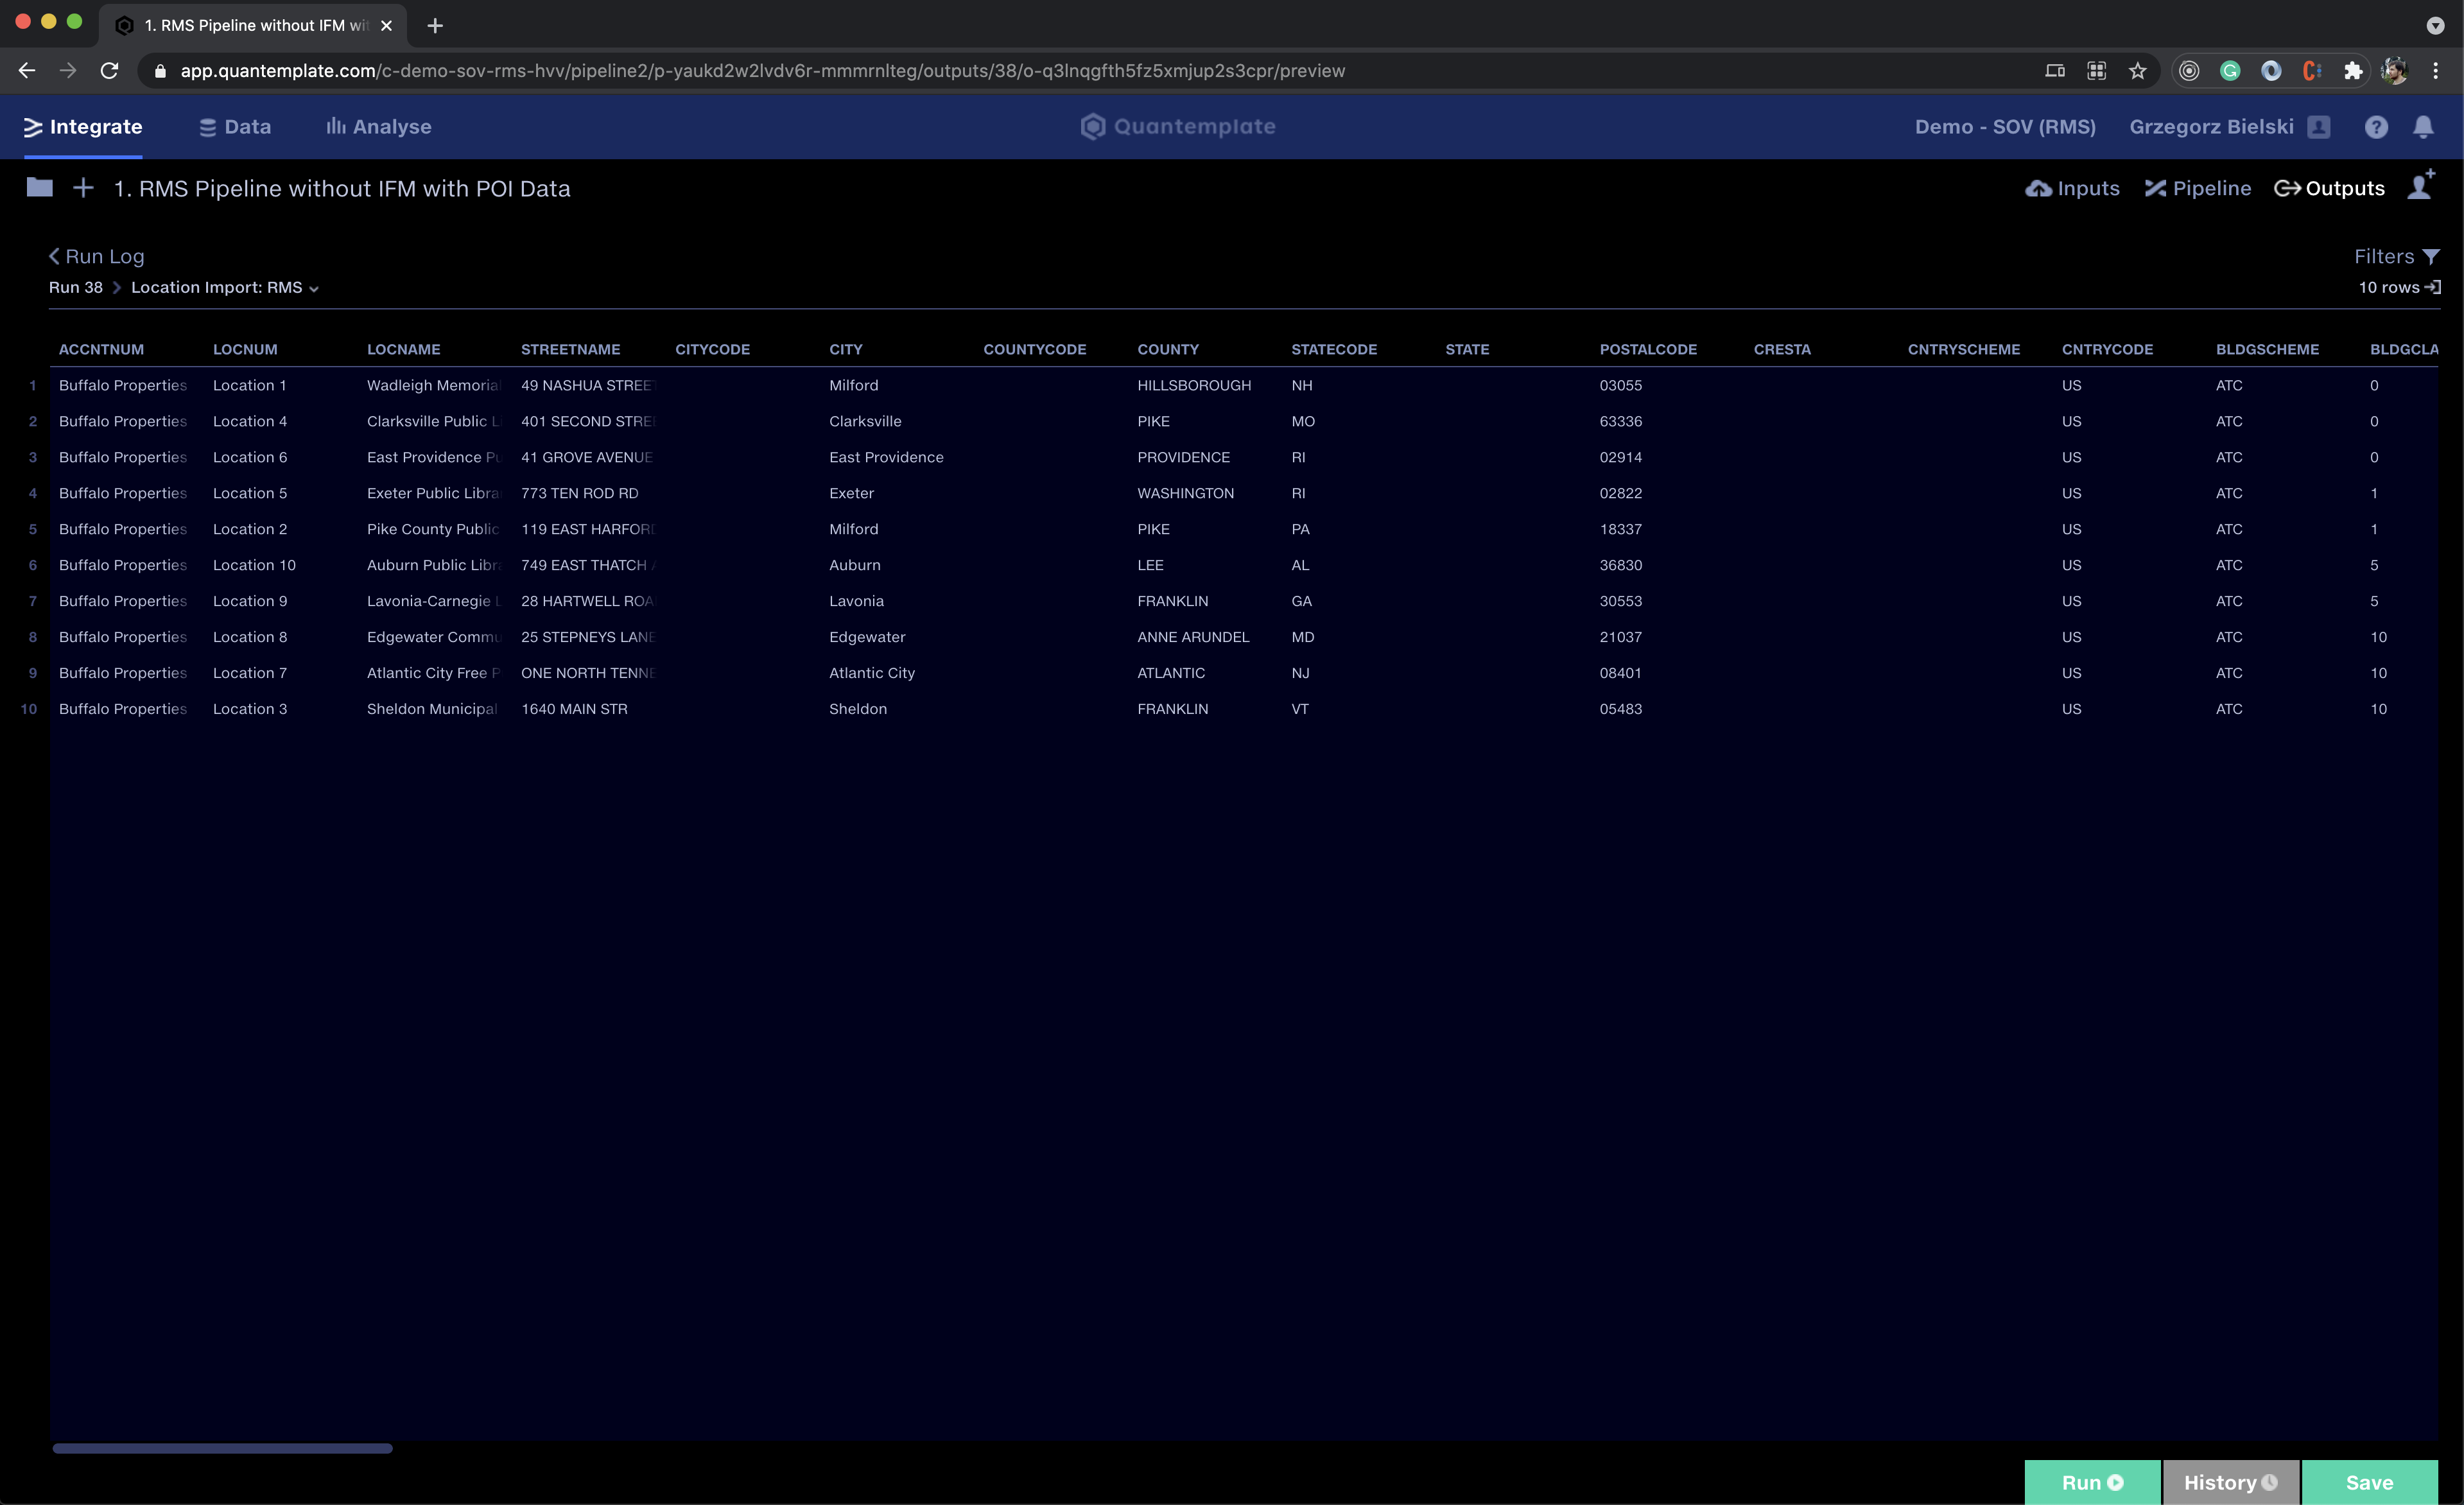
Pipeline output of pipeline A
Take a look at the URL, it has a format of:
https://app.quantemplate.com/{{organisation-id}}/pipeline2/{{pipeline-id}}/outputs/38/{{pipeline-output-id}}/preview
In the example above: https://app.quantemplate.com/c-demo-sov-rms-hvv/pipeline2/p-yaukd2w2lvdv6r-mmmrnlteg/outputs/38/o-q3lnqgfth5fz5xmjup2s3cpr/preview
From this, we can extract the ID of the organisation - c-demo-sov-rms-hvv, pipeline A - p-yaukd2w2lvdv6r-mmmrnlteg and pipeline A'a output - o-q3lnqgfth5fz5xmjup2s3cp.
We will also need the ID of the pipeline B, and its input dataset, which can be accessed from the Data tab. The IDs can be extracted in the same way.
Sharing with the API clientDon't forget to share all pipelines and datasets with the whole org, otherwise, they won't be accessible to the API client.
Step 3: Setting up the orchestration program
As described in the introduction, instead of writing code from scratch we will use an existing open-source Quantemplate API integration helper.
In order to download the helper, navigate to the releases section and click on qt-integration-0.1.3.jar. This will download Java 8+ compatible jar.
Environment variables
The integration helper expects a few environment variables used for configuring API access, in particular:
GOOGLE_MAPS_API_KEY=<api key for google maps>
 QT_ENV=<name of the Quantemplate environment, should be `prod` for any consumers>
 QT_AUTH_REALM=<name of the Quantemplate auth ream, should be `qt` for any consumers>
 QT_CLIENT_ID=<id of the api-client user generated by the Quantemplate team>
 QT_CLIENT_SECRET=<password for the used api-client user, also provided by the Quantemplate team>
You can save this file as a .env and fill out the < > spots with your settings.
Then these options could be exported as environment variables. In macOS and Linux this could be done using a simple export $(xargs < .env) command.
Step 4: Configure the Google Geocoding API integration properties
With environment variables from the previous step in your command line session, you can start using the program.
The orchestration program reads the command configuration from a YAML file.
command: cleanseAddresses
params:
  orgId: c-demo-sov-rms-hvv                                         # id of the organisation
  source:
    pipeline:
      pipelineId: p-yaukd2w2lvdv6r-mmmrnlteg                        # id of the pipeline A
      outputName: "Addresses for Geocoding: Location Import: RMS"   # name of the pipeline A output which holds a data for geocoding
      dataColumn: LOCNAME                                           # name of the column of the pipeline A's output defined above, which holds a data for geocoding
      idColumn: LOCNUM                                              # name of the column in the pipeline A's output defined above, which holds IDs for joins

  target:
    dataset: d-pkusqtimlrbnsrdlt-ho4ud2                             # id of the dataset, which is an input to the pipeline B
    onFinished:
      - action: ExecutePipeline
        pipelineId: p-r-o2ymaypvhyhtol6j62plsi                      # id of the pipeline B, which will be triggered after its input dataset is uploaded
The config above describes the operation explained in the introduction in the form of a declarative configuration.
Data from pipeline A: p-yaukd2w2lvdv6r-mmmrnlteg in the "Addresses for Geocoding: Location Import: RMS" output, under LOCNAME will be used as an input for the HTTP request to Google Maps Geocoding API. The result will be then integrated into the d-pkusqtimlrbnsrdlt-ho4ud2 dataset, which is an input to the p-r-o2ymaypvhyhtol6j62plsi pipeline, that will be triggered immediately after it is uploaded.
Step 5: Run the script
Having a YAML file created in the previous step now, you can run the integration helper with just a:
java -jar qt-integration-0.1.3.jar apply ./addressCleanse.ymlDepending on the pipeline complexity and size the run could take a few minutes to complete. The program should inform you about the progress on each step.
After the execution of pipeline B has been finished you can go to its output, and take a look at the results:

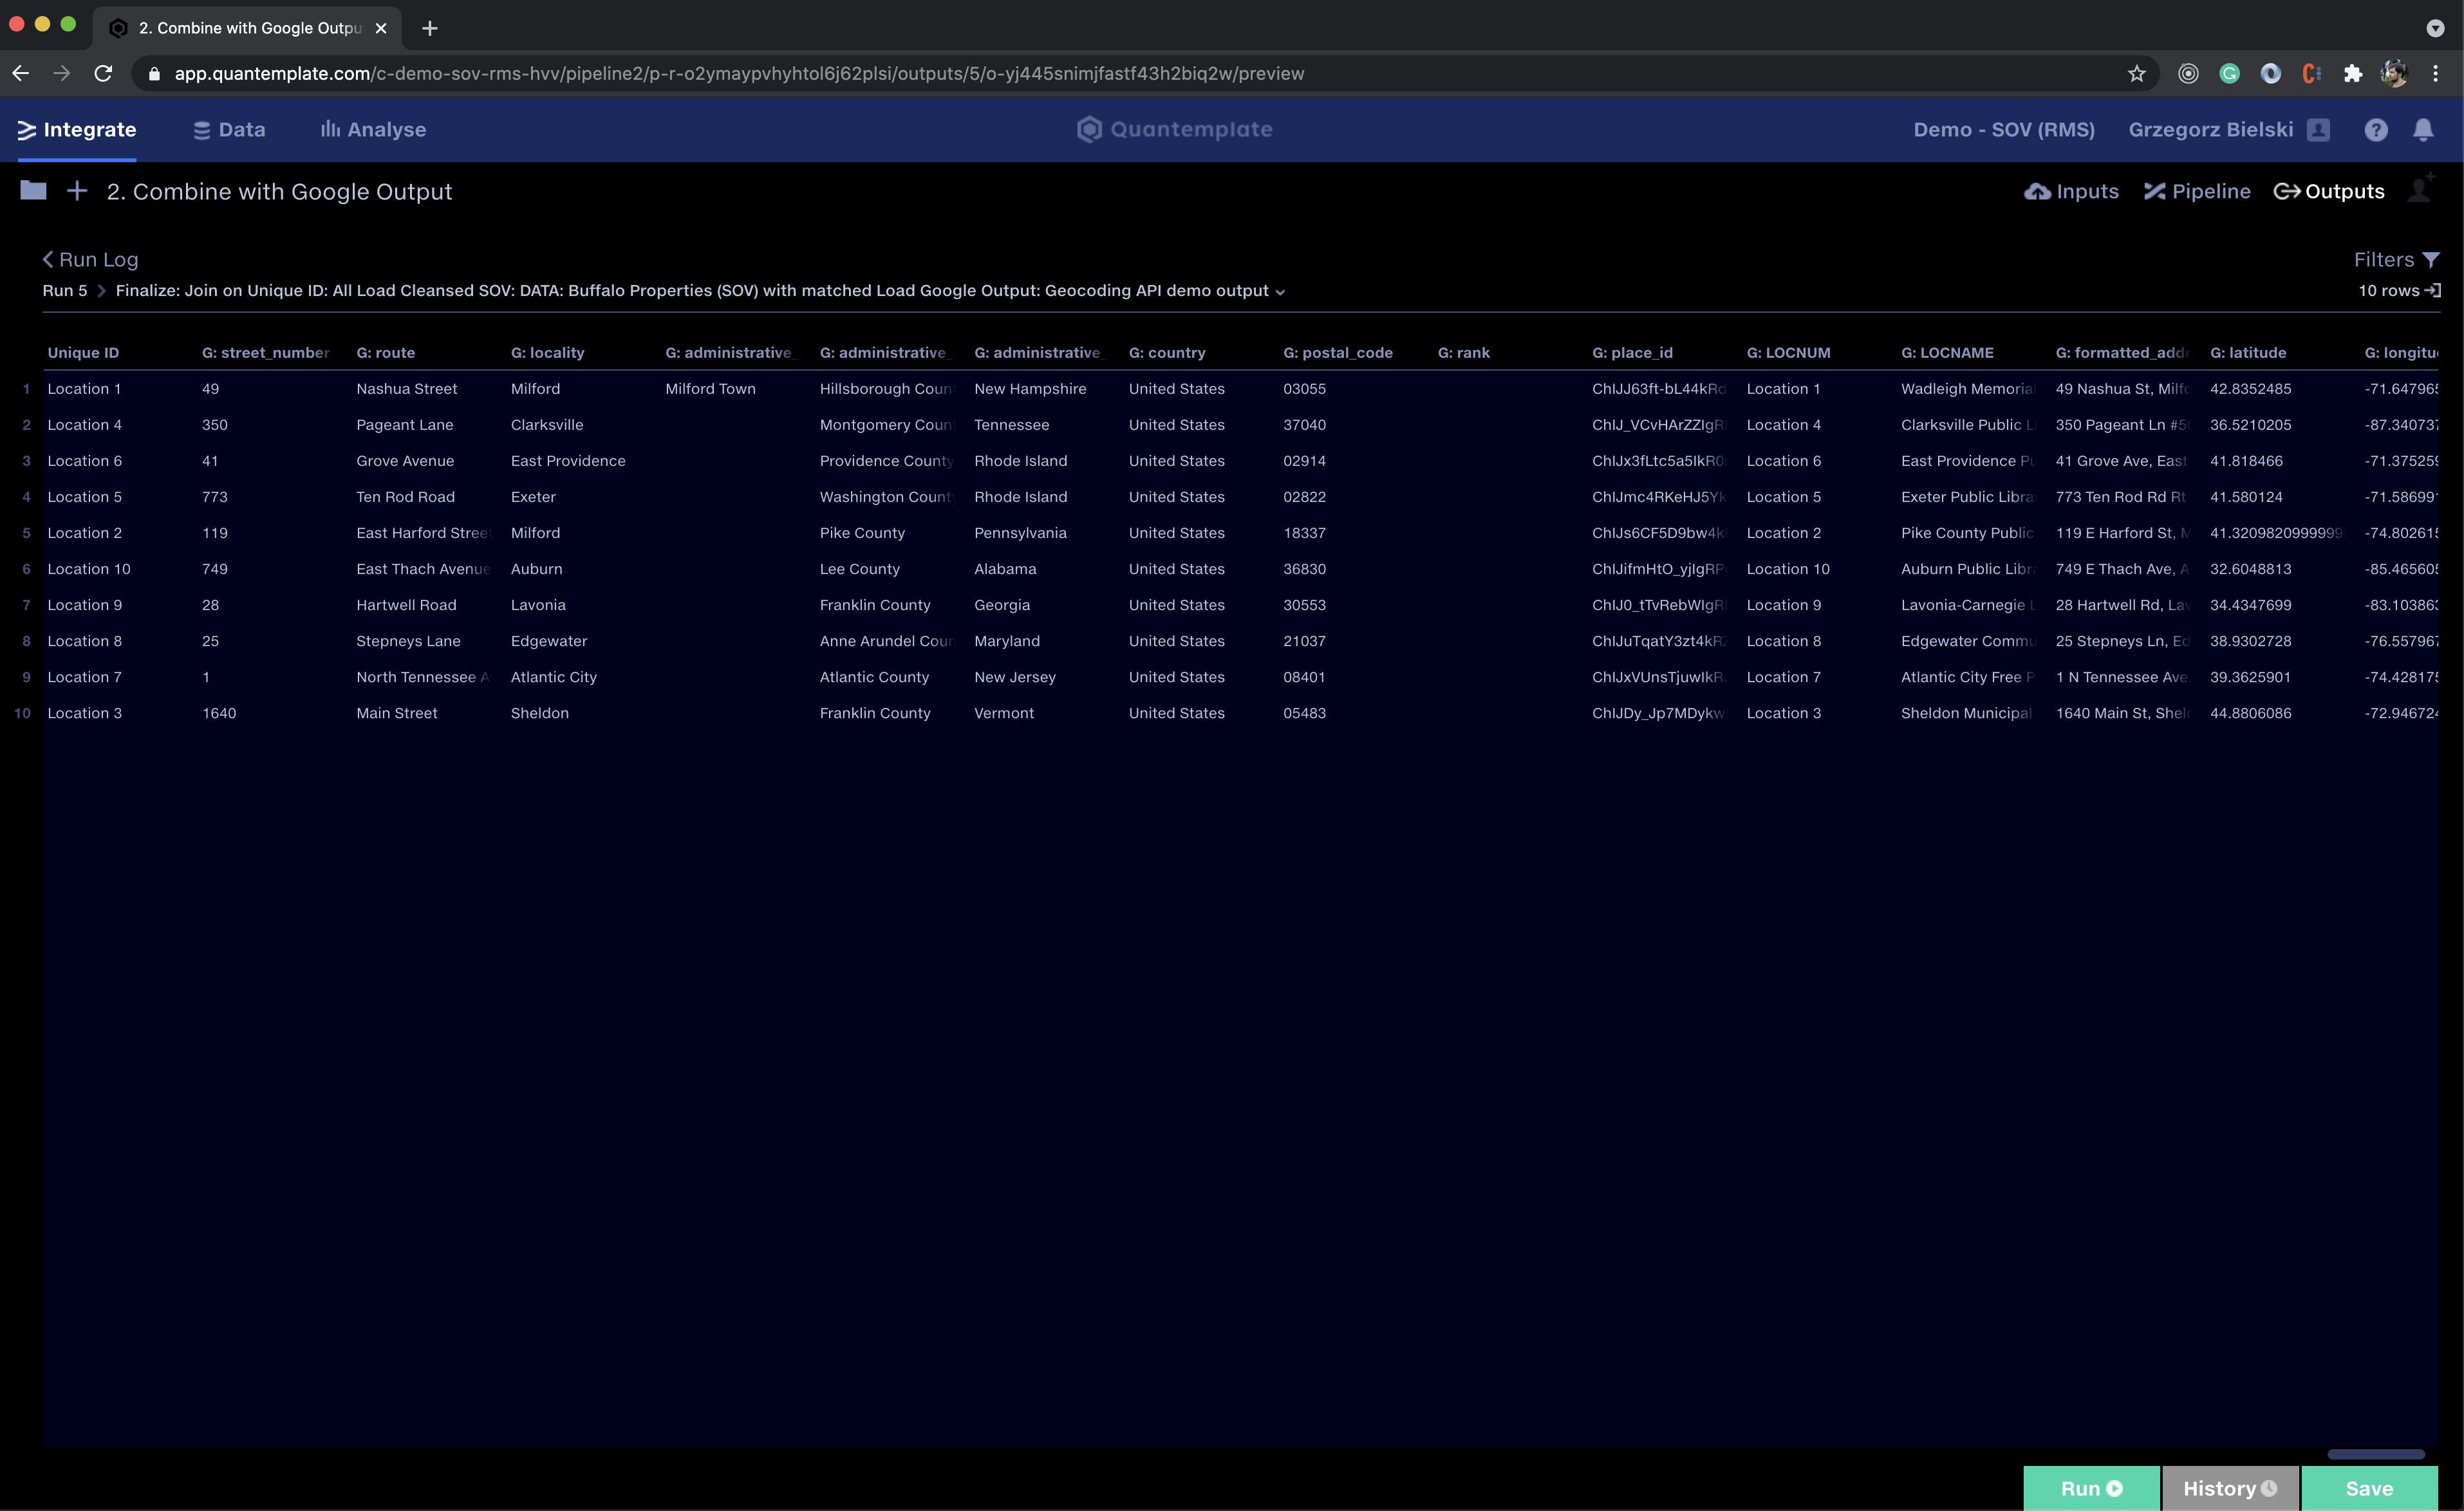
The output of the Pipeline B, which includes data from Google Geocoding API
My pipeline B used a join stage to combine data using LOCNUM described above and a Unique ID column. The headers from the dataset enriched by the Google Geocoding API were then mapped by map column headers operation which added a G: prefix to each of them.
The whole program is open-sourced so you can either extend it yourself or roll out your own solution based on its internals. And since it uses only publicly available APIs you can easily replicate it any programming language you want.
Updated 9 months ago
